When I went to remove a bolt earlier this week, I realized that it had been broken and became almost impossible to take out. In panic, I did some research to find out how I could use my vise grips to extract it safely.
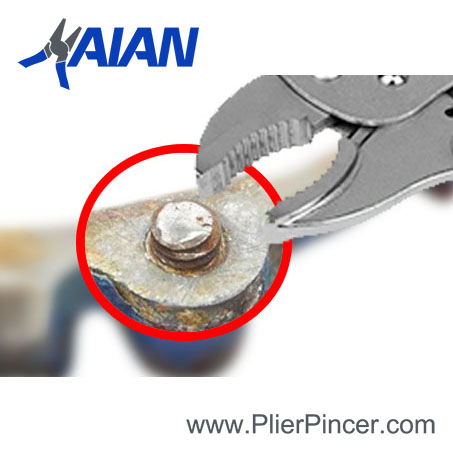
How can you remove a broken bolt with vise grips? When you are removing a broken bolt with vise grips, you will begin by using penetrating oil on the surface. The rest of the process is as simple as placing the bolt into the mouth of the grips and squeezing them like you would with pliers until you are able to remove it.
Damaged, stripped, or broken bolts can present a huge hassle and safety hazard to mechanics, especially when they are found in cars, motorcycles, or other gear that could pose a significant danger in the case of failure.
When encountering a bolt that retains its head but is otherwise damaged, one of the simplest solutions to extract the faulty bolt is to use a vise grip, a type of plier. Like many other types of pliers, the jaws of the vise grip tighten around the bolt head and then use the handles as a type of lever to loosen the bolt.
Bolts
Understanding the components of a bolt, which often works together with a nut, is critical to properly installing and using bolts safely and effectively. Bolts have several important parts.
Parts Of a Bolt:
- The head
- The shank
- Runout
- Nut
- Thread length
Underneath the head, which can be hexagonal or cylindrical (socket cap), bolts contain an unthreaded shank, also called the grip length, which joins the threaded portion of the bolt’s length via an area called the runout. A threaded hexagonal nut encircles some of the thread length.
Bolts are closely related to screws but contain some critical differences relating to their intended uses. Bolts are important components in many modern manufacturing processes, often used to compose bolted joints.
Bolted joints are fasteners that act to join unthreaded components (whereas screws are used in components that contain their own thread).
As a bolted joint, bolts act in concert with a nut, which exerts a clamping force as shank of the bolt beneath the bolt head also acts as a dowel. The length of the shank should be carefully considered, as a shank that is too long or short may experience harmful and damaging stress.
Bolt threads function as an inclined plane which, together with a nut, activate several different types of force. Clamping and preload forces cause the bolt to act like a spring as the threads engage and stretch.
When tension force, applying along the length of the bolt, exceeds that of the preload force, the bolt may break. Shear force works against the bolt in a perpendicular direction, and sometimes acts in concert with tension force against bolt integrity.
Bolts break through user error when they are under or over tightened or when a user attempts to work with a bolt shank of the incorrect size. Other causes of bolt breakage are excessive vibration, manufacturing flaws, extreme shock, or differential thermal expansion (if the bolt and joint materials are different).
Vise Grips (Locking Pliers)
Vise grips, also known as locking pliers, are a type of plier designed to extract nuts and bolts for demolition. Invented by Danish blacksmith William Peterson in Nebraska in the mid-1920s, vise grips combine the locking grip of a traditional vise with the functionality of pliers.
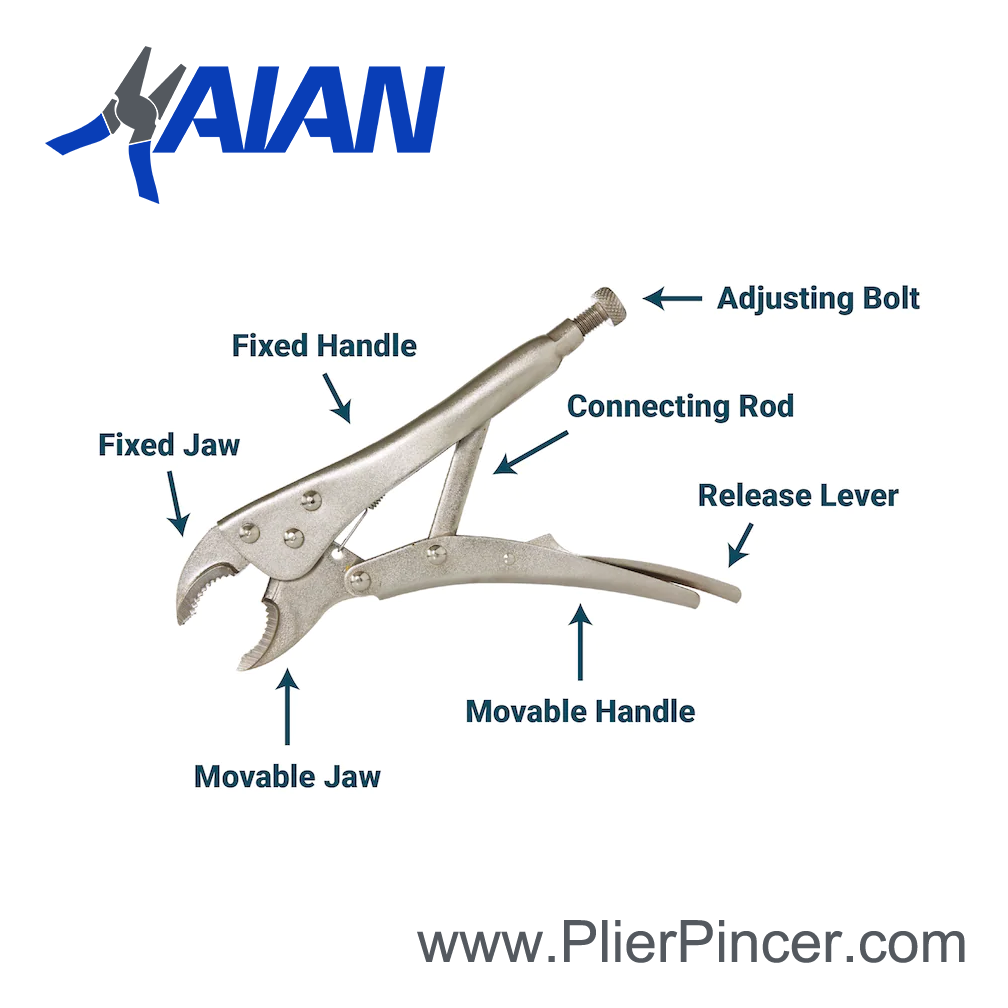
There are two main types of vise grips, straight-jaw and long-nose (alligator) vise grip pliers. Each contain several features, as outlined in the list down below.
Features Of Vise Grips (Locking Pliers):
- 2 jaws, one of which moves, constituting the jaw link
- Fulcrum (pivot point)
- Moving handle (handle link)
- Stationary handle (fixed link)
- Locking link
- Unlocking lever
When locking pliers snap closed on a bolt head the angle of force between the ends of the four links measures slightly less than 180 degrees.
The force in the jaws keeps the handles locked, the result of four-bar linkage, a foundational concept in mechanical engineering. Squeezing the handles of the locking pliers exerts force in the opposite direction, toward an angle greater than 180 degrees.
The opposing forces result in potential energy which is stored and exerted along all the links in the system, including the object in the pliers’ jaws. The result is that vise grips have a far stronger and more precise lever force than that of ordinary pliers.
How Do You Remove a Broken Bolt with Vise Grips?
Removing a broken bolt with vise grips requires a bolt head or some other bolt component to be present upon which the vise grips can lock.
After locking onto the bolt, vise grips function both as a pair of pliers as well as a wrench. Like other tasks requiring wrenches, vise grips simply require some elbow grease to loosen bolts.
8 Steps for Removing a Broken Bolt with Vise Grips:
- Saturate the bolt joint with penetrating oil, which should help lubricate the threads. Allow the oil to soak in over several days.
- Locate the bolt you want to remove and decide whether you need straight-jaw or alligator vise grips. Both will work, but alligator vise grips tend to be used for smaller, harder to reach objects.
- Open the pliers completely by pulling the handles away from each other.
- Locate the plier mouth adjustment bolt at the end of the fixed handle. Screw clockwise for smaller objects and counterclockwise to accommodate large objects.
- Place the jaws on the bolt to size for adjustment. If you squeeze the handles and the jaws don’t lock, you’ll need to make the mouth wider. (Paradoxically, the angle of four-bar linkage is inverse to the angle of the jaws).
- When the jaws are the correct size, you’ll hear a click when you squeeze the handles together and the locking plate will no longer be flush with the moving handle link.
- Loosen the bolt by using the vise grips as you would a wrench – counterclockwise to loosen, clockwise to tighten.
- Push the locking plate flush to the handle and the pliers will pop open.
Vise grips will only work if there is an object that the pliers can grasp. Even then, vise grips will not always extract the bolt you need to remove.
However, you should always try to remove bolts with vise grips first if possible before working your way up to more complex and invasive methods.
Safety Tips for Using Vise Grips
Safety considerations when using vise grips are similar to those you’d follow when using an ordinary pair of pliers. Vise grips are designed specifically for removing damaged bolts and screws. It is not advisable to use them as you would a normal wrench.
Safety Tips For Using Vise Grips:
- Always use gloves and safety goggles to protect your face and hands from metal filings, especially when working with objects that have rusted because of the risk of tetanus.
- Do not use vise grips as a hammer. They are not designed to withstand repeated shocks.
- Vise grips are designed to remove faulty bolts and nuts. Using locking pliers as you would a wrench risks overtightening, which damages the integrity of bolts and makes them vulnerable to breaking.
- Unless specifically designed for welding purposes, avoid exposing vise grips to high heat.
- Grips attached to pliers, including vise grips, are not generally intended to protect from electric shock. Ensure that the object you’re working on is not connected to electrical currents.
Remember that vise grips, like most other tools, require regular cleaning and oiling. Always wipe vise grips clean after use to remove stray metal filings and debris. Oil with 3-in-1 or WD-40 to maintain lubrication but be careful not to over lubricate the pliers.
Other Ways to Remove Broken Bolts
Broken bolts can only be removed with vise grips if some portion of the bolt is accessible from the surrounding surface. Even then, vise grips may not be sufficient to remove damaged bolts or may embed the bolt further in its surrounding materials.
If your attempts to remove a bolt using vise grips as described above have failed, there are a few other options that are more complex and require greater intervention. Always start with the least invasive solution and work your way up.
If the vise grips do not succeed in removing a bolt, you have two options: using an extractor kit or using one of a few welding techniques.
Use a bolt extractor if the head of the bolt has broken off or is otherwise inaccessible. You’ll need a center punch, a drill, a drill-extractor set (Easy-Outs), and WD-40.
How To Use a Bolt Extractor:
- Put on safety glasses and gloves to protect your eyes and hands from metal filings.
- First, attempt to drill out the broken bolt with a left-handed drill bit and reverse drill.
Flatten and smooth the surface at the end of the broken bolt with sandpaper or a grinder to prevent the drill from moving off center.
Create a small pilot hole using a center punch and hammer.Use a 1/8th inch drill to start, then switch to a 1/4th inch drill.
If you’re lucky, the bolt fastener will easily spin out of the threaded hole. You will know you’re making progress if metal “chips” come out of the hole.
If you are unlucky, the drill will not produce “chips” and may smoke. If this is the case, stop immediately. You will have to attempt to use a drill-extractor set to remove the bolt. You can purchase a set of Easy-Outs at most hardware stores for between $10 and $20.
How To Use a Drill Extractor:
- Flatten and smooth the bolt surface and create a new pilot hole with a center punch.
- Drill a small center drill in the hole that you’ve created with the center punch using a left-handed drill bit to avoid tightening the bolt.
- Select a drill bit slightly smaller than the Easy-Out that you’ll use for the bolt. Use the drill bit to continue expanding the hole in the bolt. The bolt shank will be driven further into the shaft. You should continue to see metal “chips” flying from the hole.
- Insert the Easy-Out into the hole you’ve drilled and use a hammer to tap it into place in the bolt shank.
- When the Easy-Out is secured, use a wrench or pair of flat-nose pliers to grip the end of the Easy-Out.
- Turn the Easy-Out counterclockwise to remove the bolt shank from the hole.
Hopefully, you’ve successfully used the Easy-Out to extract the bolt. However, it’s possible (perhaps even likely) that the Easy-Out will crack the bolt further or, even worse, will break off inside the bolt. This is a worst-case scenario because the Easy-Out heads are made of hardened steel and are virtually impervious to drill bits.
If you have encountered a worst-case scenario in which the Easy-Out has broken off in the bolt shank, you still have options, but will unfortunately be in for a bit of a struggle. The goal is to use the Dremel to physically grind down the steel of the Easy-Out, which is hardened but brittle.
You’ll need a Dremel, a grinding stone bit, and a chain-saw sharpening bit. A quality Dremel will cost you $50 and $75, but it’s cheaper than a trip to the shop.
How To Use a Dremel:
- Attach a bit to your Dremel.
- Turn some music on – you’ll be here for a while.
- Turn the Dremel on.
- Dremel until you hear a crack or feel some give. You may be at it for a long time.
- Watch the Easy-Out eventually crumble to dust.
While this method will be effective in removing the broken bolt if needed, there is a more careful way that you can go about the task.
If you want to extract a bolt without the risk of breaking an Easy-Out off inside a bolt shank, you can try some welding techniques.
These will only work so long as there is some threading exposed. You’ll need a mig or stick welder, a center punch, and a drill. You shouldn’t attempt to try this method unless you have experience welding or a friend who know what they’re doing.
How To Remove The Bolt With Welding:
- Flatten and smooth the bolt surface and create a new pilot hole with a center punch.
- Drill out the center of the bolt using a left-handed drill bit to avoid tightening the bolt.
- With whatever threading is exposed, thread a hexagonal nut onto the bolt. The nut should be attached firmly, but not flush with the surface in which the bolt is embedded.
- Weld the bolt to the nut but be careful that the surface in which the bolt is embedded does not melt to steel. It’s best if the surface is aluminum or another material that does not weld well to steel.
- Let the weld cool. It will be firm but not unbreakable. For very corroded bolts, you may need to re-weld the nut and bolt together more than once.
- When the weld has cooled, remove the bolt with a wrench. Try working the bolt gently back and forth to loosen the corrosion bonds before trying to remove it entirely.
Aside from the options that have been discussed throughout this section, rethreading is another method of removing a bolt that has broken. Keep reading to find out how you can execute this method safely and properly.
After removing a damaged bolt, you may need to rethread the hole from which the bolt was removed. Never attempt to force an incorrect bolt into a bolt hole of the wrong size. You will strip the threads and ruin another bolt.
How To Use The Rethreading Method:
- Clean the hole and coat the interior with engine oil.
- Choose a thread tap that matches the bolt’s original thread pattern. A tap set will cost around $15 at a hardware store.
- Coat the tap in oil.
- Work the tap into the hole by hand until tight, then continue tightening with a wrench. The tap is cleaning and re-cutting damaged threads.
- Remove the tap and re-cover with oil, then continue working the tap in and out, being careful not to over tighten it.
- Remove the tap and clean the hole.
- Coat the threads with thread-locking material ($5-$7) to seal the repair.
For very damaged threads, follow the above steps and then use a chemical filler to further repair the threads. After using the filler, immediately insert a bolt. Wait for the filler to dry, then remove the bolt.
Breaking a Bolt for Removal
If you really need to remove a stubborn bolt yourself, there are a few options you can try to remove it and replace it with new material.
What You Will Need:
- Breaker bar
- Propane torch
- Wax
- Transmission fluid (with acetone)
- Drill
- Nut-splitter
- Angle-grinder
You may need a breaker bar, a propane torch, wax, transmission fluid with acetone, a drill, a nut-splitter, or an angle-grinder. Use any one or a combination of these methods to break corrosion force and break a stubborn bolt for removal.
Use blunt force to break corrosion bonds. Strike the bolt with a chisel or punch several times or use an impact wrench repeatedly in forward and reverse to loosen the bonds before using a vise grip to remove the bolt.
Heat can break chemical corrosion bonds. Use a propane torch heat the bolt until red hot which may help to loosen bonds. Then, when the bolt has cooled, strike the bolt with an impact wrench. Then, try using a vise grip again to remove the bolt.
Make “relief cuts” on the head of the bolt or nut with a chisel and hammer, then use a vise grip to once again attempt to loosen the and remove the bolt. Some other escalating methods of breaking and removing a blot are detailed below.
How To Break a Bolt For Removal:
- Always attempt to clean the bolt and lubricate it with penetrating oil. Let the oil soak into the bolt for several hours before attempting to loosen and remove the bolt. Rock the bolt with a wrench or vise grips to try to break corrosion force within the bolt hole.
- Use a breaker bar, which is a long-handled socket wrench. You will be able to lean into the wrench and exert maximum leverage. If you twist very hard the bolt may twist and break.
- Use a propane torch to break corrosion bond.
- Heat the bolt with a propane torch as hot as you can without melting the bolt.
- Remove the heat and soak the bolt in cool water to speed up cooling. Placing with bolt immediately in cold water may crack it. You may attempt using a breaker bar or vise grip again to remove the bolt.
- Apply paraffin candle wax to stuck bolt threads, which will hopefully lubricate the threads and allow you to unscrew the nut.
- Apply a half and half mixture of transmission fluid and acetone to the bolt several times over the course of an hour, allowing the mixture to soak into the bolt. Try removing the bolt once more with a vise grip.
- Use a left-handed drill bit to drill into the bolt and reverse the drill to remove the bolt.
- Purchase an appropriately sized nut splitter ($10) and fit it over the nut.
- Turn the screw head of the nut splitter in a counterclockwise direction.
- Using the splitter for leverage, ratchet the nut free.Or, continue tightening the screw head until the nut shatters. You may have to use a wrench to accomplish this.
- If the nut splitter does not work, use an angle grinder to cut the head off the bolt or to cut through a nut, then pull the bolt out.
Bolts are essential components of many machines but can be easily broken or damaged because of heat, manufacturing error, time, overuse, or user error (using the wrong bolt or stripping threads).
Bolts use the strong mechanical forces of planes and springs to form joints but if weakened, the bolt joint can break apart, leading to accident or injury.
If you find that a bolt is broken, stuck, or damaged, or if you want to replace an old bolt that you suspect may be damaged, always first attempt to address the problem with a wrench, then a pair of locking pliers, which magnifies the lever force of most common pliers and wrenches.
Vise grips are incredibly useful tools that will often suffice to remove stuck bolts, especially in conjunction with penetrating oils.
If you find that a vise grip is insufficient to remove a stubborn bolt, you can attempt to use a drill, or an extractor set to remove the bolt.
Remember that Easy-Out extractors are often brittle, so use these tools with care to avoid breaking an Easy-Out off inside a bolt shank, which often represents a worst-case scenario and necessitates a trip to the shop.
Alternatively, you can attempt break corrosive bonds with vinegar or rust removal products, but since most of the bonds are hidden deep within a bolt hole, this type of attempt will likely not get you far.
Another effective method of removal involves using heat to break bonds by means of a torch. Heat is effective in breaking corrosion, but you should be exceptionally careful when heating metal and always use safety equipment to protect your hands and face. Don’t attempt to weld a nut and bolt together if you don’t have welding experience.
If you have been successful in removing a bolt from its hole, you may be able to use a tap to re-form the threads. However, you should never attempt to over tighten a tap or force a bolt into a hole.
In most scenarios, if you fail to remove a bolt using vice grips or an extractor, do not attempt to continue forcing Easy-Outs into a bolt or straining with vice grips.
Using heat can be dangerous and attempting to force an extractor into a bolt often proves catastrophic. Do not be afraid to take old machinery to a shop or find a friend with some experience. It’s better to spend a little money than to permanently ruin an antique or irreplaceable part.
To conclude, there are plenty of ways to remove a bolt that has broken. After reading this article, you are probably relieved at the good news that it isn’t the end of the world. As long as you follow through with proper procedures and safety tips, you will have a quick solution to your problem in no time!